
Aoyalis is a leading manufacturer and supplier of waterproofing materials, waterproof paint, and advanced stone chemical solutions. With a 2,000 square meter production facility, cutting-edge equipment, and a dedicated R&D team, we offer high-quality, durable, and eco-friendly products for professional use across the construction and stone care industries. Subsurface water intrusion is one of the most destructive forces a residential or commercial property can face. Left untreated, hydrostatic pressure forces moisture through porous concrete, leading to structural degradation, mold proliferation, and compromised indoor air quality. From our experience in formulating industrial-grade coatings, addressing this moisture at the source requires a meticulous, step-by-step approach. Implementing the correct steps to DIY basement waterproofing from inside will not only protect your property but also save thousands of dollars in contractor fees.
Executing the steps to DIY basement waterproofing from inside demands proper material selection, stringent surface preparation, and the application of highly engineered membranes. Our chemical engineers emphasize that interior waterproofing is primarily about managing the moisture that has already breached the outer foundation wall, trapping it before it evaporates into the living space. We recommend following this detailed protocol to ensure a permanent and professional-grade seal.
Table of Contents
- 1. Understanding Hydrostatic Pressure
- 2. Step 1: Inspecting and Identifying Water Sources
- 3. Step 2: Surface Preparation and Cleaning
- 4. Step 3: Repairing Cracks and Voids
- 5. Step 4: Applying the Waterproof Coating
- 6. Step 5: Waterproofing Specialty Materials
- 7. Step 6: Addressing Exterior Vulnerabilities
- 8. Summary Table: Steps to DIY Basement Waterproofing from Inside
- 9. Frequently Asked Questions (FAQs)
- 10. References
1. Understanding Hydrostatic Pressure
Before initiating the steps to DIY basement waterproofing from inside, one must understand the physics of water intrusion. Hydrostatic pressure occurs when groundwater builds up against the exterior of a foundation wall. The weight of this water creates immense pressure, forcing moisture through the capillary tracts inherent in poured concrete and concrete block (CMU) walls. The primary goal of DIY basement waterproofing from inside is to create a negative-side waterproof barrier. Negative-side waterproofing means applying the protective coating on the dry side of the wall to hold back water penetrating from the wet side. Our advanced formulations are explicitly designed to withstand this negative hydrostatic pressure without delaminating.
2. Step 1: Inspecting and Identifying Water Sources
The very first of the steps to DIY basement waterproofing from inside is conducting a comprehensive diagnostic inspection. We recommend examining the foundation walls and floor slab during or immediately following a heavy rainstorm. Look for active weeping, damp dark patches, efflorescence (white, powdery mineral deposits left behind by evaporated water), and areas with peeling paint.
It is crucial to distinguish between true seepage and internal condensation. Tape a square piece of clear plastic sheeting to the bare concrete wall using duct tape. Leave it for twenty-four hours. If moisture forms on the room-facing side of the plastic, you are dealing with high indoor humidity requiring a dehumidifier. If moisture forms against the concrete side of the plastic, water is actively permeating the foundation. Once you confirm active seepage, you can proceed with the physical steps to DIY basement waterproofing from inside.
3. Step 2: Surface Preparation and Cleaning
From our experience supplying advanced chemical solutions to professional contractors, surface preparation accounts for eighty percent of a successful waterproofing job. Any coating applied over dirt, efflorescence, or old flaking paint will fail. The steps to DIY basement waterproofing from inside mandate that you strip the concrete down to its original, porous state.
- Remove Old Coatings: Use a wire brush or a mechanical grinder to strip away old paint, sealers, or adhesives. Waterproofing compounds must penetrate the open pores of the concrete to achieve a mechanical bond.
- Clean Efflorescence: Treat mineral deposits using a specialized concrete cleaner or a diluted muriatic acid solution. Neutralize the acid thoroughly with water afterward.
- Dust and Debris Removal: Vacuum the walls and floor joints to remove all silica dust. We recommend wiping the walls down with a damp sponge to ensure a completely clean substrate. Allow the surface to dry fully before proceeding.
4. Step 3: Repairing Cracks and Voids
Once the walls are pristine, the next critical phase in the steps to DIY basement waterproofing from inside is structural patching. Waterproof paint cannot bridge active structural cracks or large holes. You must fill these voids using hydraulic cement.
Hydraulic cement is unique because it expands as it cures, effectively locking itself into the crack and stopping active water flow instantly. We recommend chiseling out the crack into a reverse-V shape (wider at the back than at the surface) using a cold chisel. This allows the hydraulic cement to form a mechanical plug that hydrostatic pressure cannot push out. Mix the cement in small batches, as it sets within three to five minutes, and force it deep into the prepared cracks. Pay special attention to the cove joint, which is the seam where the concrete floor meets the wall, as this is highly susceptible to water intrusion.
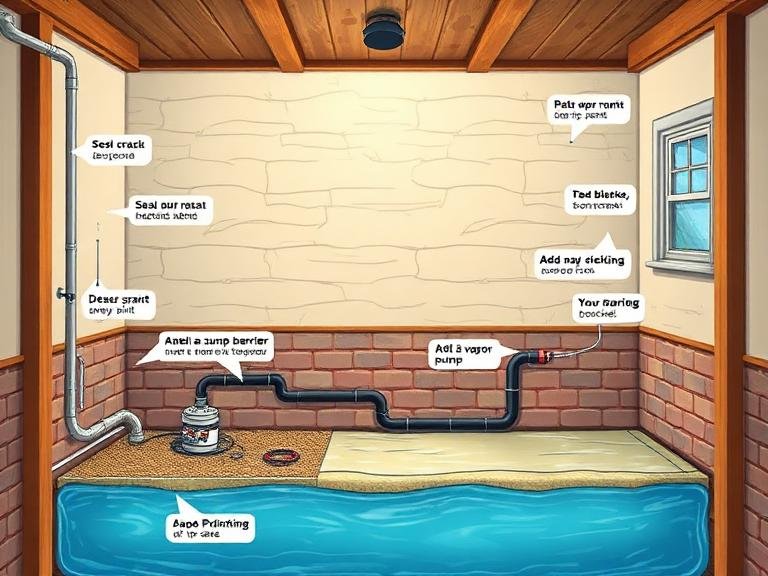
5. Step 4: Applying the Waterproof Coating
With the foundation cleaned and sealed, you are ready for the core application phase of the steps to DIY basement waterproofing from inside. Selecting the right coating is imperative. For heavy-duty protection, our R&D team has engineered specific solutions that provide an impenetrable barrier.
For broad concrete wall coverage, we recommend utilizing a paintable waterproof membrane. This type of coating goes on thick like traditional paint but cures into a highly flexible, rubberized barrier that moves with minor foundation settling. Apply the first coat using a heavy-nap roller, working the material aggressively into the concrete pores. Wait for the designated curing time, and apply a second coat perpendicular to the first to ensure absolute coverage without pinholes.
For floor-to-wall joints, pipe penetrations, and areas subjected to extreme hydrostatic load, utilizing a liquid rubber waterproof sealant is highly advantageous. Liquid rubber offers superior elongation properties, meaning it stretches without tearing, making it an excellent primary sealant for vulnerable transitions in your DIY basement waterproofing from inside project.
6. Step 5: Waterproofing Specialty Materials
Often, a basement finishes involves a mix of construction materials. The steps to DIY basement waterproofing from inside are not limited to just concrete. If your basement features subfloors, partition walls, or utility enclosures made from wood or synthetics, these materials require tailored chemical protection.

For wooden structural supports or plywood subflooring installed over the concrete slab, moisture vapor can cause rot and delamination. We recommend treating all wooden components with a dedicated waterproof paint for plywood. This prevents ground moisture from migrating up into your finished flooring. Similarly, if your basement utilizes plastic utility sink basins, PVC piping arrays, or synthetic vapor barriers that require sealing, applying a specialized waterproof paint for plastic ensures seamless integration and prevents peeling on non-porous surfaces.
Furthermore, if your basement renovation includes adding a bathroom, standard basement coatings are not sufficient for direct water exposure. You must implement a specialized waterproof membrane for showers behind the tile or enclosure to prevent shower water from damaging the underlying basement framing.
7. Step 6: Addressing Exterior Vulnerabilities
While mastering the steps to DIY basement waterproofing from inside creates an exceptional negative-side barrier, we advise a holistic approach. Addressing external moisture loads reduces the hydrostatic pressure your interior coatings must fight against.
Ensure that your gutters are clear and that downspouts discharge at least five feet away from the foundation. Grade the soil around your home so it slopes away from the basement walls. If any portion of your foundation is exposed above grade, treating it with an outdoor waterproof paint provides a first line of defense against driving rain. For expansive exterior masonry exposed to the elements, utilizing a heavy-duty waterproof exterior wall paint will stop moisture absorption before it even reaches the subterranean levels of your foundation.
8. Summary Table: Steps to DIY Basement Waterproofing from Inside
| Step Sequence | Action Required | Recommended Aoyalis Approach / Material |
|---|---|---|
| Step 1: Diagnostics | Identify weeping, efflorescence, and active leaks. | Perform the 24-hour plastic sheet moisture test. |
| Step 2: Surface Prep | Remove old paint, clean efflorescence, vacuum dust. | Wire brush to bare concrete; use masonry cleaner. |
| Step 3: Crack Repair | Seal all structural cracks and the cove joint. | Apply expanding hydraulic cement into reverse-V chiseled cracks. |
| Step 4: Membrane Application | Coat concrete walls and floors with primary barrier. | Use liquid rubber waterproof sealant or paintable waterproof membrane. |
| Step 5: Specialty Sealing | Protect subfloors, framing, and utility pipes. | Apply waterproof paint for plywood and plastic. |
| Step 6: Shower Integration | Waterproof new basement bathroom installations. | Apply waterproof membrane for showers prior to tiling. |
9. Frequently Asked Questions (FAQs)
10. References
For additional authoritative information regarding residential moisture control, indoor air quality, and foundation preservation, we recommend consulting the following resources:
- United States Environmental Protection Agency (EPA): Moisture Control and Mold Prevention Guidelines
- U.S. Department of Housing and Urban Development (HUD): Healthy Homes Moisture Management